Using Composer Like a Pro: Tips & Tricks
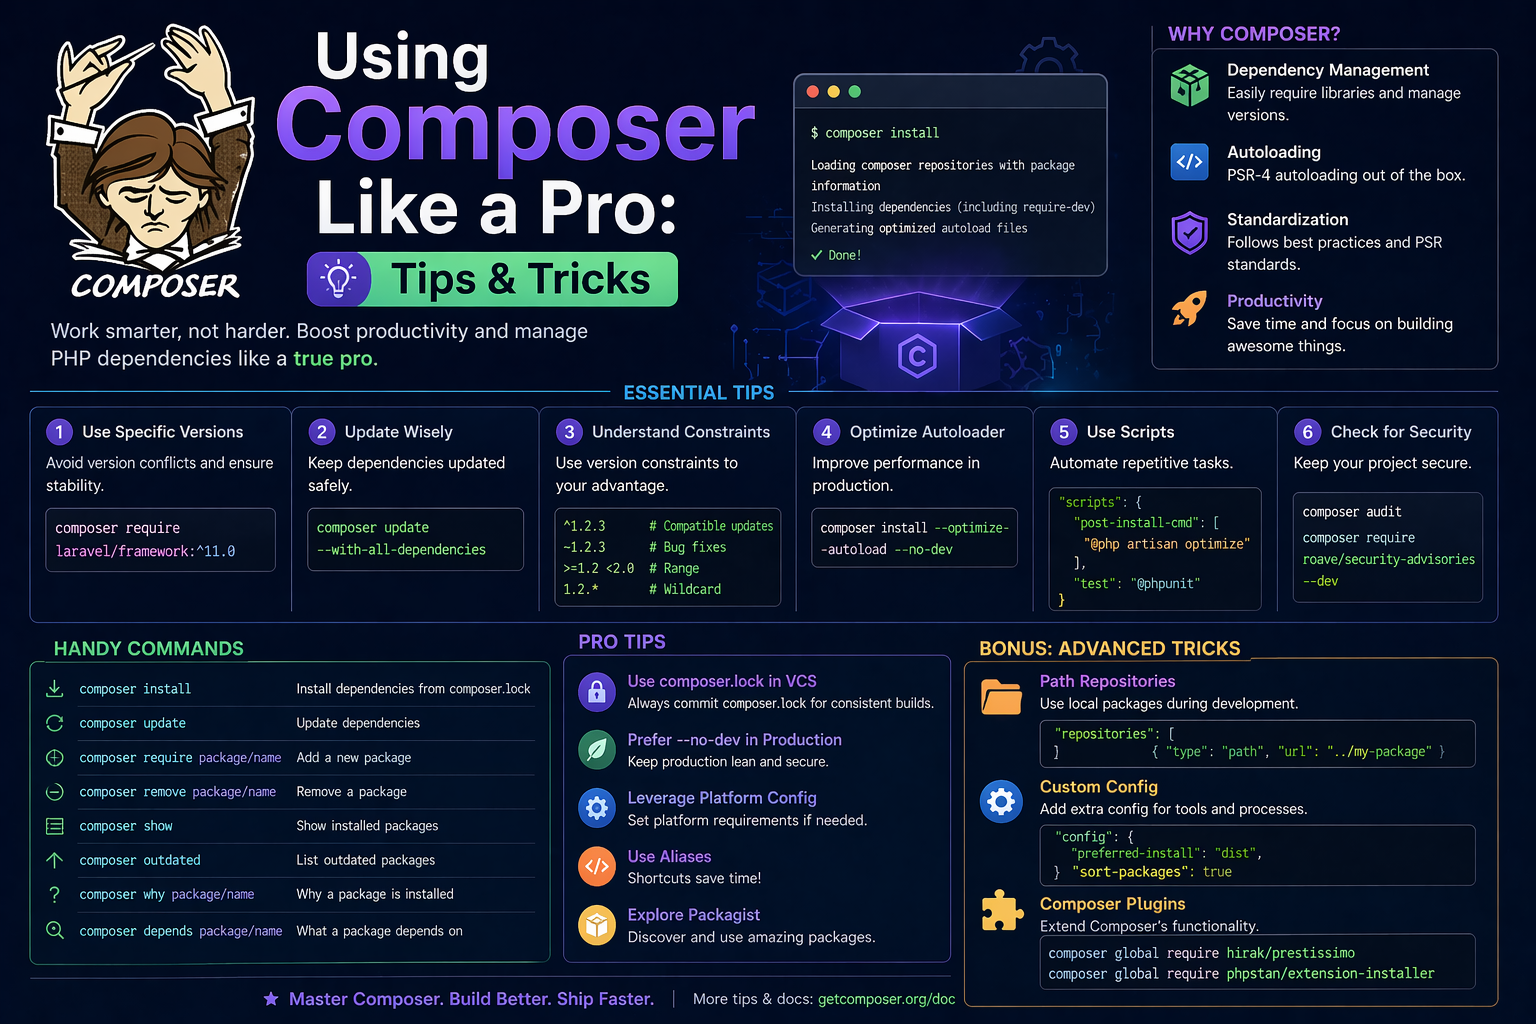
In the world of modern PHP development, Composer has become a must-have tool. It’s not just a dependency manager — it’s the backbone of efficient and organized PHP projects. Whether you’re working with Laravel, Symfony, or a custom PHP application, mastering Composer can save hours of setup time and help you manage code like a pro.
This guide will show you how to use Composer like a professional developer, with practical tips, powerful commands, and workflow tricks to take your PHP projects to the next level.
What Is Composer?
Composer is a dependency manager for PHP that automatically installs and manages libraries your project depends on. Instead of manually downloading packages, Composer allows you to declare them in a single file — composer.json — and handles the rest.
Why Composer Matters in Modern PHP
Before Composer, developers manually copied library files into projects. This led to version conflicts, outdated code, and painful updates. Composer solved these issues by introducing:
-
Automatic dependency management
-
Version control compatibility
-
Project isolation
-
Autoloading support
Simply put, Composer allows developers to focus on writing code, not managing packages.
Getting Started with Composer
Installing Composer
You can install Composer globally on your system using the command:
To verify installation:
This displays the installed Composer version.
Creating Your First Project
To start a new PHP project using Composer:
This creates a composer.json file that contains information about your project, including dependencies and version constraints.
Installing a Package
For example, to install GuzzleHTTP, a popular HTTP client:
Composer automatically downloads the library and its dependencies into a vendor directory.
Understanding composer.json and composer.lock
composer.json
This file defines your project’s dependencies, autoloading rules, and metadata.
Example:
composer.lock
The composer.lock file locks the exact versions of installed packages. This ensures consistency across all environments (development, staging, production).
Pro Tip: Always commit composer.lock to your version control system to guarantee identical setups for your team.
Essential Composer Commands Every Developer Should Know
1. Installing Dependencies
This installs all packages listed in composer.lock. Use it when setting up existing projects.
2. Updating Dependencies
Updates all dependencies to their latest allowed versions based on the version constraints in composer.json.
3. Removing Packages
Removes a package and updates both the composer.json and composer.lock files.
4. Autoload Optimization
Composer generates an autoload file for easy class loading. Optimize it for production:
This improves performance by creating a class map for faster loading.
5. Checking for Outdated Packages
This lists all outdated dependencies, helping you keep your project secure and updated.
6. Diagnosing Issues
Runs system checks to identify configuration problems or potential conflicts.
Advanced Composer Tips and Tricks
Tip 1: Use Global Packages
You can install Composer packages globally to use them across all projects:
Global packages are stored in ~/.composer/vendor/bin. Add this path to your system environment variables for easy access.
Tip 2: Leverage Custom Scripts
Composer allows you to define custom scripts in composer.json for automating tasks.
Run them using:
This is ideal for repetitive commands like running tests or starting a local server.
Tip 3: Use Version Constraints Wisely
Composer allows flexible version management. Examples:
-
^7.0means compatible with 7.0 and higher minor versions. -
~1.2allows updates up to (but not including) 2.0. -
1.5.*includes all patch versions under 1.5.
Pro Tip: Avoid using * in production environments — it can break dependencies unexpectedly.
Tip 4: Use the --no-dev Flag for Production
When deploying your app, install only essential packages:
This excludes development tools like PHPUnit or Debugbar, improving performance and security.
Tip 5: Handle Private Repositories
Composer supports private repositories, making it ideal for enterprise or internal use:
Then install packages normally:
Tip 6: Optimize Dependencies
Sometimes multiple libraries depend on different versions of the same package. Use:
This helps identify conflicts preventing installation.
Tip 7: Autoload Custom Namespaces
Define your custom namespace in composer.json:
Then regenerate autoload files:
Now, you can use your classes directly without manual includes.
Tip 8: Use Composer Scripts for CI/CD
Automate tasks like testing, building, or clearing caches during deployment:
This ensures your app runs key setup commands after installation or updates.
Managing Large Projects with Composer
For big applications, Composer can handle multiple dependencies efficiently.
Splitting Projects into Modules
Use path repositories to manage internal modules without publishing them:
This allows local development of multiple packages simultaneously.
Using Composer in Docker or CI Environments
Add Composer installation to your Dockerfile for reproducible builds:
Combine this with composer install --no-dev for production-grade images.
Troubleshooting Common Issues
Problem: Memory Limit Errors
If you encounter memory issues while running Composer:
This disables memory limits temporarily for large dependency updates.
Problem: Package Conflicts
Run:
to pinpoint version conflicts and fix dependency mismatches.
Problem: Slow Installation
Use the --prefer-dist flag to speed up installations by downloading prebuilt archives:
Best Practices for Composer Power Users
-
Always commit both
composer.jsonandcomposer.lock. -
Run
composer validateto check for syntax issues. -
Regularly update Composer with
composer self-update. -
Use semantic versioning for consistent package management.
-
Cache Composer dependencies in CI/CD pipelines for faster builds.
Conclusion
Composer is far more than a PHP package installer — it’s a complete project management and automation tool. By mastering its commands, understanding version control, and leveraging advanced features like scripts, autoloading, and private repositories, you can transform your workflow into a professional-grade system.
Whether you’re developing small PHP scripts or enterprise-grade Laravel applications, Composer ensures your projects remain consistent, secure, and easy to maintain.
Once you start using Composer like a pro, you’ll spend less time managing dependencies and more time doing what truly matters — building powerful, efficient, and scalable PHP applications.


